Search This Blog

Thursday, July 5, 2012

Professional lettering

I saw this on .... PINTEREST... and HAD to try it. Print out what you want to paint onto your project using Microsoft Word, trace and perfect!

Her is a sign for outside of my classroom:
Supplies:
- Wood from Joann's ($2)
- Silver marker on hand ($4) 
- Navy spray paint on hand ($1.50)
- Cute anchor ($0.70)

1. Sprayed wood navy blue, dried over night.
2. Typed "Mrs. Brady Kindergarten" in Microsoft Word I made sure I put the font on "outline" [select font, right click, FONT, then click on "outline"]. 
3. Traced words onto spray painted wood.

4. Painted letters in with a paint pen.

5. Painted anchor white, then added silver polka dots around anchor

6. Glue anchor onto sign.
7. Sprayed with clear to "set" and "save" my sign for years to come!


This is a place mat that I used the same technique on:
1. I bought this place mat at Joann's on clearance this week ($1-2).
2. I printed out "Welcome to the Brady's" using Microsoft Word. I made sure I put the font on "outline" [select font, right click, FONT, then click on "outline"].
3. Pushed VERY hard while tracing the words onto the foam place mat.
4. Ta-da!


Friday, March 23, 2012

[awesome] cupcakes

These are the cupcakes that I made for our youth group dessert auction fundraiser.

[Supplies]
- Pillsbury cupcake mix $1.10 on sale at Kroger
- Eggs $0.99 on sale at Kroger
- Oil borrowed from my neighbor because I ran out
- Whipped white icing $1.69 on sale at Kroger
- Plain white icing $1.20 on sale at Kroger
- Cupcake liners I had a bunch on hand, about $1-3 each, I always buy them on sale or clearance at Kroger, Joann, Michael's, etc.
- Cupcake pan plenty in stock at my house
- Variety of decorations $0.10-0.80 each at the Bulk Food/Candy store
- Disposable Aluminum cake pans $1 for 3 from Dollar Tree
- Plastic tray (for rainbow cupcakes) $1 at Dollar Tree

[BAKE!]

I made 1 batch of white cake cupcakes came out to 22 cupcakes. I made sets of 3, 4, or 8 cupcakes and decorated each set differently.


I followed the baking directions on the cupcake box. I always mix wet ingredients first and let the eggs get fluffy then I add in the cake mix.

I let the cupcakes cool, then I iced them and added embellishments (details below)

[Over the Rainbow]

I made the rainbow cupcakes last (all out of one batch of cake mix). I scooped batter into a measuring cup and added food coloring (one color at a time) until I got the color I wanted (about 5-10 drops of each color). I layered the different colors (in color order) one at a time. I didn't worry about making every layer the same or perfect.

yellow batter

first layer

green and blue layers

purple and red layers

baked cupcake in the pan

full view
(you can see my 1950's gold fleck counter top)

[mostly] finish product
half of the cupcakes had spiral whipped icing with rainbow sprinkles
half of the cupcakes had blue icing with "Sour Rainbow Tracks" cut into 2 1/2in long pieces then stuffed into white whipped frosting to hold it up and it looks like fluffy little clouds


[Butterfly garden]

I purchased gummy-butterflies from the bulk store I put them on top of dyed yellow coconut to make it look like the middle of a flower. I then put the cupcake inside of an inside-out Wilton(R) cupcake purple flower liner. I piped purple antennae onto cupcakes.
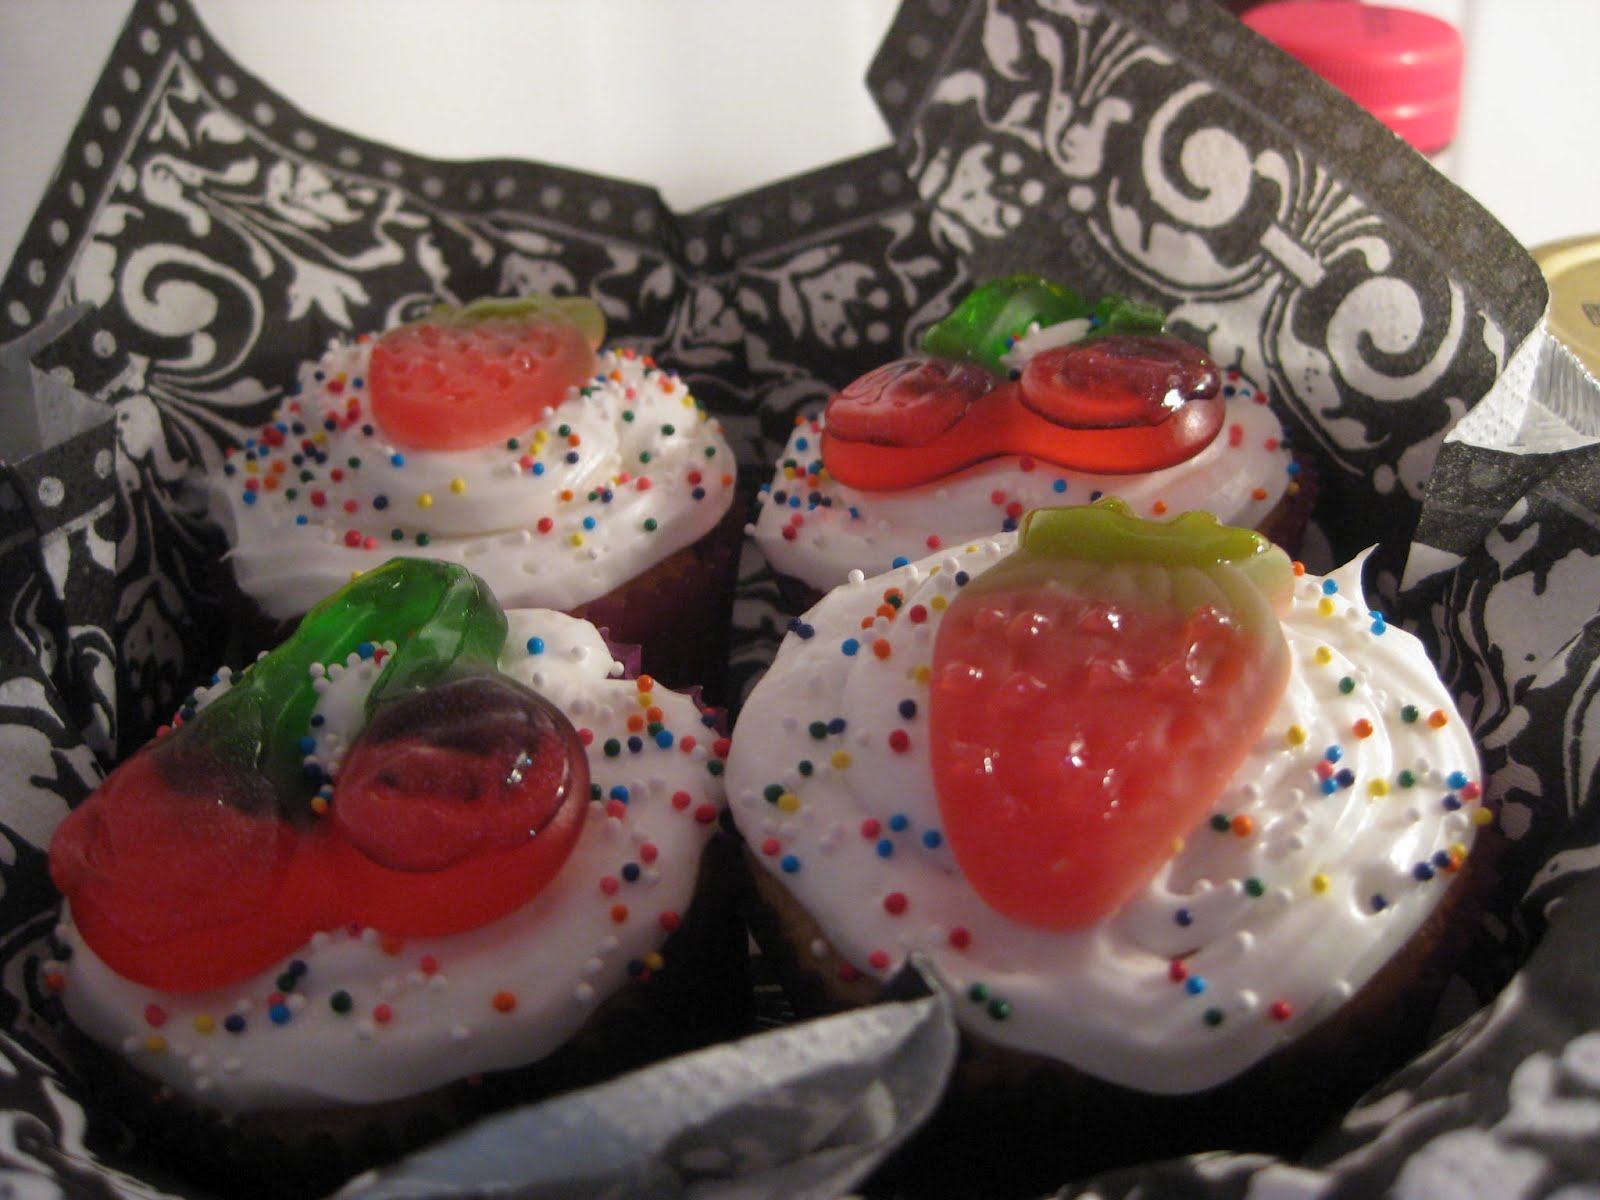

[Cherry Berry]

Whipped white icing with gummy strawberries or cherries on top. I sprinkled little rainbow balls to help make them a little more fun. You can see the napkin liner I put inside of each aluminum tray I got from the dollar store to dress up the containers.

[Under the sea]


To give the cupcakes a swirled effect I put in a few tablespoons of batter, then I added blue food dye to the cupcakes, then added a few more tablespoons of batter (you get the idea) stirring with a toothpick.

After the cupcakes came out of the oven.

Finished product. Blue icing swirled to make "waves" (I used a knife and I pulled up to make the little peaks) Then I added gummy sea life Swedish fish and a gummy shark from the bulk store. The sand is crushed gray-ham crackers (as my Oma says).

Dessert Auction Fundraiser


[Background]
Our youth group puts on an annual dessert auction to help send middle school and high school teens to summer camp. My husband and I are the high school youth leaders at our church. Two of our good friends work with the middle school group. Between the two groups we have about 20 students ages 11-19.

[How it works]
We try to make the auction as simple as possible. We try each year to limit the number of desserts by having a sign up sheet, but it never works. Teens earn 100% profit from the desserts that they make themselves to sell at the auction. The profit from other desserts that are donated from other church members goes into a general fund and is divided evenly between the teens that work the auction.

[Decor]
This year I did a "rainbow" theme for the decor. I purchased 2 black tablecloths for $1 ea, 1 rainbow tablecloth for $3, and 2 brightly colored tablecloths, $1 ea. After our evening church service we set up 3 long tables in the middle of our fellowship hall (black, rainbow, black) then put on 5 cylindrical vases running the length of the tables. Each vase was filled "Easter" basket straw (one of each color: pink, orange, yellow, green, blue). I made signs for the different types of desserts and placed them into the colored vases (like a cupcake topper). Categories were brownies, cupcakes, pies, specialty desserts, and cookies. Looking back I should have added a "cake" category.

[Going, going, gone!]
The auction usually lasts about 1.5-2 hours. People are pretty spent by the end of the event, so we try to move quickly. I choose a dessert off of the display table then students show off each dessert around the fellowship hall for about 2 minutes before we bring it to the front to auction off. We start each dessert at $5. We make it kinda cutesy and give everyone a homemade auction paddle (numbered small paper plates taped on to thick Popsicle sticks). My husband is the MC of the event, he points to people as they bid on each dessert. When someone wins an item we have one adult at the head table writing down who bought the dessert and for how much. The dessert is then delivered to the winner by the student who walked it around the hall. Since we are hoping people will buy multiple items we wait until the end of the event to ask people to settle their "tab." Desserts usually sell for $5-$20. There are a few "special" desserts for a super-awesome-baker that go for a lot more. Super-awesome-baker's Cheesecake $70, Cookies $50, and her cake $45. We made about $1200 this year!

[My donations]
I was going to add in the cupcakes I made, but it's a lot. So check for another post on the cute cupcakes I made.


If you host a dessert auction fundraiser I would love to know what you did to make it successful!

-e


Sunday, February 26, 2012

Homemade Books


In our Kindergarten class we make little word family books about every other week, we have decodable books that go with our ELA curriculum that go home weekly and we have leveled A-Z Reading books. Get the gist? ...... there are a lot of little paper books in our room. I've been trying to get them organized and usable for the kiddos.

Since we had a snow day Friday and we are down to one car I've been home all weekend and I've been working hard to get these books put together.

I woke up Saturday with a great idea.... Zig Zag sew the spine of the books. Not to toot my own horn...but GENIUS! I'm so excited about these little books and I can't wait to get all the books done!

My photos are uploading correctly... so I can only post 1 photo right now.

1. I colored the little books or had my community helpers color.

2. Cut up all of the pages to equal sizes.

3. Laminated all the little pages, cut again, leaving a slight edge around the pages.

4. Organized and ordered the pages of each book.

5. Then I Zig Zag stitched right at the edge of the spine of each little book. One stitch through the paper and on off the edge of the book.

6. Repeat, Repeat, Repeat... (I have about 100 of these books I want to make)

Here is a close up of one of the little word family books.
Students make these in class weekly and get to take them home. The ones I'm working on are for a classroom set, I want to make sure they last.

You can get *FREE* word family little books from Scholastic teaching resources.

enjoy! Hopefully I can repost with more photos later.
-e

I would love to hear your comments or questions!

Thursday, February 9, 2012

Classroom snap shots

Here are some snapshots of my classroom!

Reading area & word wall


*Free* Highlights foam blocks


Measuring center


Introduction to measuring- Unifix cubes


Presenting work to the class


Saturday, January 7, 2012

[sight word] practice!


I saw a sight word car game on on Pintrest. I loved the game, but I needed to make it usable in a classroom setting with 25 other kiddos. I designed the following game for my kiddos to try when they get back this week!
I made the game in Microsoft Word with 12 sight words that we are working on this month. I also make little car cut outs for the kiddos to park on each parking space.
We have been playing this game for about 2 weeks, the kids seem to enjoy it.

Monday, January 2, 2012

My Classroom!

I've been in my [own!] classroom and teaching[!] for 3 months now. Over Christmas I realized a lot of my friends and family have heard all about my room, but haven't seen it. Many people have made great contributions and donations to my room too! Thank you to everyone who has helped make my room what it is!

entrance to my room. lunch volunteer sign-up. most of my lunches are covered by our *AMAZING* para, she's my favorite!


looking into my room from the door

[standing in the middle of my room turning counter clockwise]
the "back" of my room. amazing cabinets. ....and a lot of my mess, that's why I'm at school today...

[standing in the middle of my room turning counter clockwise]

my desk/nook.

rainbow table where I work with kiddos during centers

sink & bathroom

[standing in the middle of my room turning counter clockwise]

2 windows looking out to the main road- my room gets great light!

you can see a big space to the left of the shelves, my computers are on loan for our MAP testing during January.

in front of the shelves is our writing table/center. the kiddos *LOVE* it!

the lake & light house- Moral Focus for each month "Good Character & Morals shine through"

our school-wide behavior management chart

[standing in the middle of my room turning counter clockwise]

black cart near window- after center choices (the kids think they're playing, but their practicing skills we have already learned)

my green "teacher"/"reading" chair

yellow board- calendar, hundred chart, touch math number line

[standing in the middle of my room turning counter clockwise]

front of the room. alphabet/sound cards at the top of the room. cards start off on the letter side, when we learn the sound we flip the card over- kiddos *LOVE* seeing the cards flip over. I also have sign language letters up for the kinesthetic learners. "CHAMPS" at the top of the white board, daily schedule on the left and "I Can" statements on the right. ....it's a little messy right now.....

[standing in the middle of my room turning counter clockwise]

interactive word wall- felt with velcro words

[standing in the middle of my room turning counter clockwise]

gray shelf is our classroom library

[standing in the middle of my room turning counter clockwise]

cubbies- kiddos got to make their own name tags about a month into school. mrs. brady storage above the cubbies

[standing in the middle of my room turning counter clockwise]

back to the door. you can see the pond with frogs to the left of the door- "Hop To It!" classroom jobs.